31 Dollar Store Easter Crafts to DIY This Spring
If you’re looking to add some fun and creativity to your Easter celebrations without breaking the bank, you’ve come to the right place! We’ve put together a collection of 31 easy DIY Easter crafts you can whip up using supplies from your local dollar store. From colorful decorations to cute gifts, these budget-friendly projects are all about getting crafty and enjoying the holiday spirit.
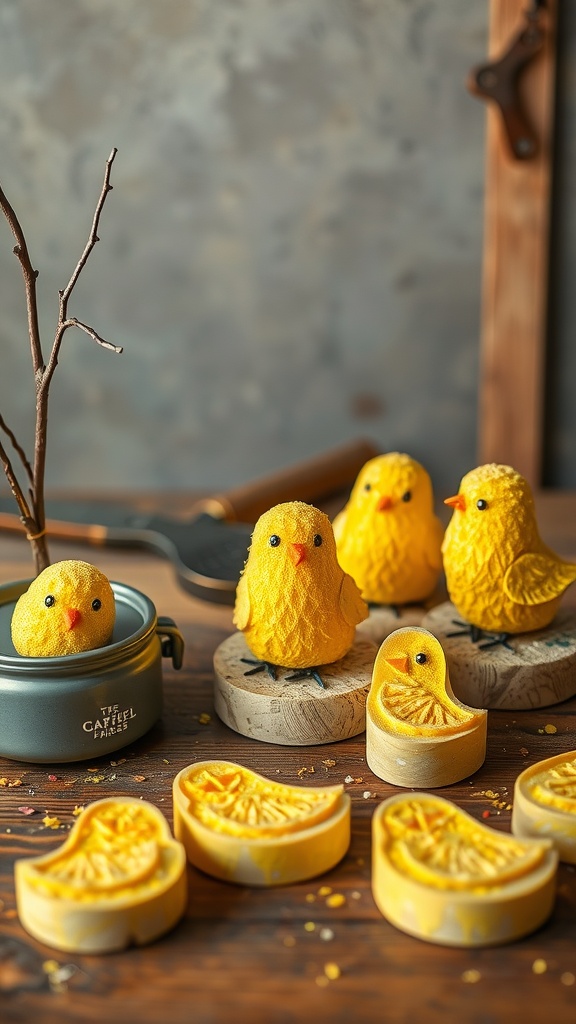
Egg Carton Chicks
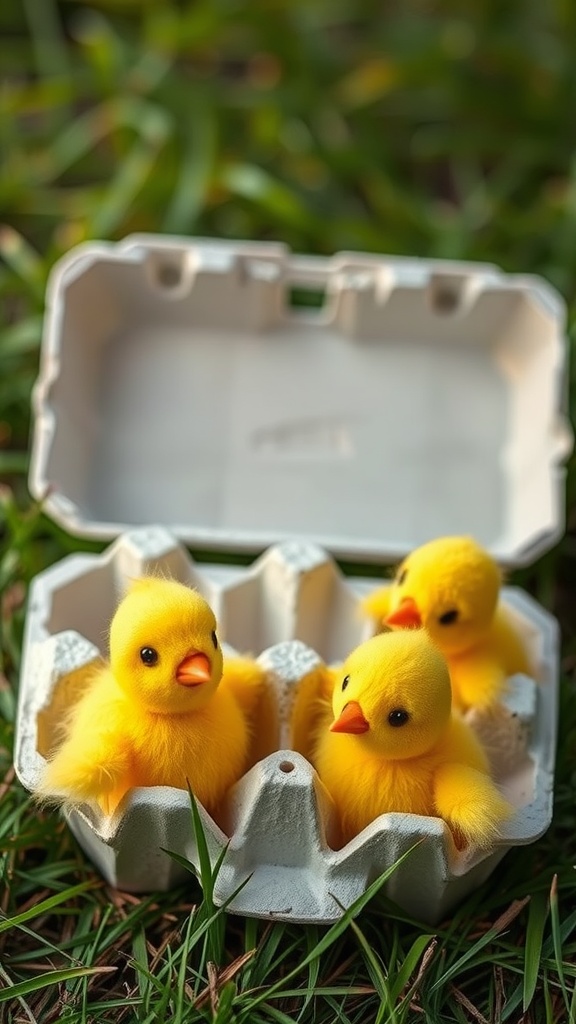
Egg carton chicks are a charming DIY craft that brings a touch of spring to your home. Using simple materials, you can create adorable little chicks that are perfect for Easter decorations. The image showcases cute yellow chicks nestled in an egg carton, instantly evoking the joy of the season.
To make your own egg carton chicks, start by gathering a few supplies. You’ll need an empty egg carton, yellow paint, scissors, and some small orange paper pieces for the beaks. You can also grab some googly eyes to give your chicks a fun personality.
Begin by cutting the egg carton into individual cups. Paint them yellow and let them dry. Once dry, glue the googly eyes and orange beaks onto each chick. You can even add small feathers for an extra touch of fluffiness!
This craft is not only easy to make but also a delightful activity for kids. It encourages creativity and is a great way to recycle materials you already have at home. Set them up on your Easter table or use them as part of a festive centerpiece. Egg carton chicks are the perfect way to celebrate the holiday!
Colorful Egg Wreaths
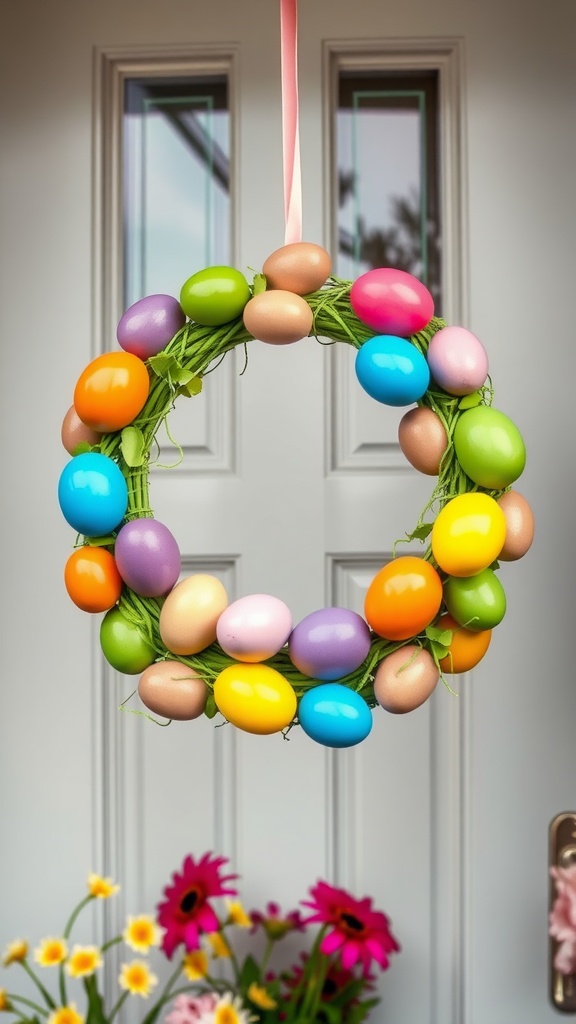
Brighten up your home this Easter with a colorful egg wreath! These wreaths are a cheerful way to welcome the season and can easily be made using supplies from your local dollar store.
The wreath in the image features a delightful mix of pastel and vibrant eggs, all nestled in a green base. This not only adds a pop of color but also brings a touch of spring indoors. With a simple ribbon for hanging, it’s both charming and easy to display.
To make your own, gather plastic eggs, a foam or grapevine wreath base, and some green floral wire. Start by securing the eggs around the wreath, alternating colors for a playful look. Finish off with a pretty ribbon, and you’re all set!
This DIY project is a fun activity for family and friends, making it a lovely way to bond while crafting. Plus, it’s an affordable way to bring some holiday cheer to your front door.
Floral Easter Egg Centerpieces
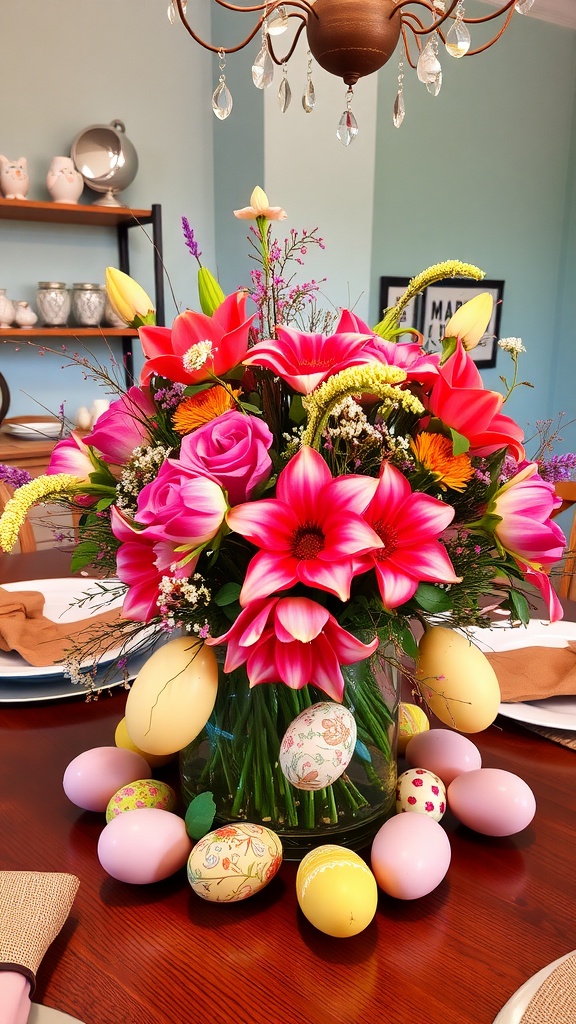
Spring is the perfect time to bring a splash of color into your home, and floral Easter egg centerpieces are a fun way to do just that! The image shows a vibrant bouquet of flowers beautifully arranged in a clear vase. The bright pink lilies and roses stand out, creating a cheerful atmosphere.
Surrounding the vase are decorative eggs in soft pastel colors, adding to the Easter theme. These eggs can be picked up at your local dollar store, making it easy to create a festive look without breaking the bank. You can even personalize them with your own designs!
To make your own centerpiece, start by selecting a variety of fresh or faux flowers. Choose a mix of colors that complement each other. After arranging the flowers in the vase, scatter the decorative eggs around the base. This adds a playful touch that invites everyone to gather around and celebrate the season.
Don’t forget to place your centerpiece on your dining table or coffee table as a focal point. It’s an easy DIY project that enhances the holiday spirit and adds brightness to your home.
Paper Plate Bunny Masks
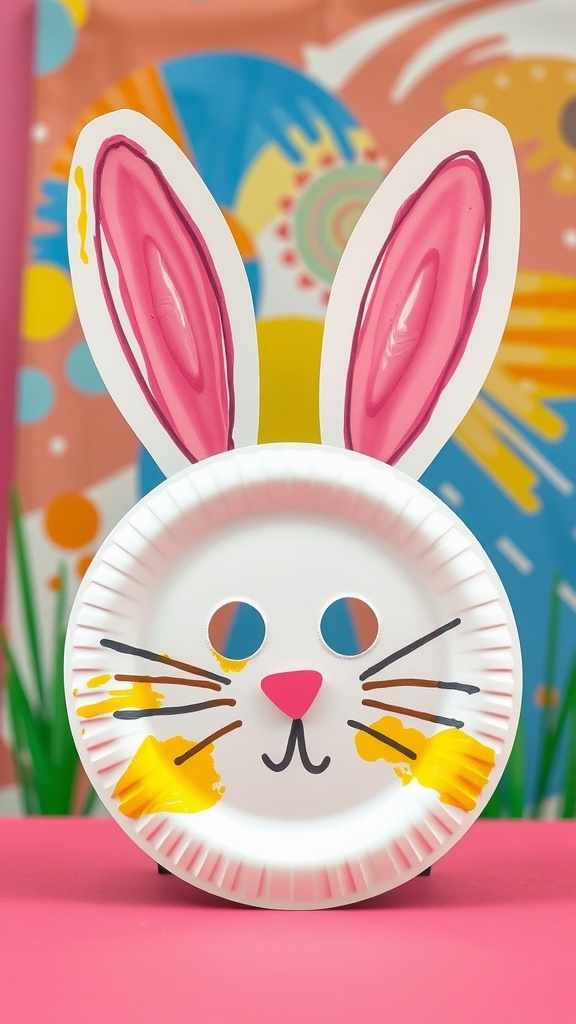
Paper plate bunny masks are a fun and simple craft idea for Easter celebrations. Using basic materials, you can create adorable bunny masks that kids will love. All you need is a paper plate, some paint, and a few basic craft supplies.
The image shows a cheerful bunny face on a paper plate. The mask features two large, colorful ears and a cute bunny nose, making it perfect for little ones to wear. The vibrant colors add a festive touch, enhancing the mood of any Easter gathering.
To start, gather your supplies: paper plates, markers or paints, scissors, and string or elastic to hold the mask in place. First, cut out eye holes in the plate. Next, paint or color the face to bring your bunny to life. Don’t forget to draw the whiskers and nose!
Once you’re done decorating, attach string or elastic to the sides so it can be worn comfortably. This craft is not only a creative outlet but also encourages imaginative play. Kids can hop around as bunnies, making it a delightful addition to your Easter festivities.
Popsicle Stick Crosses
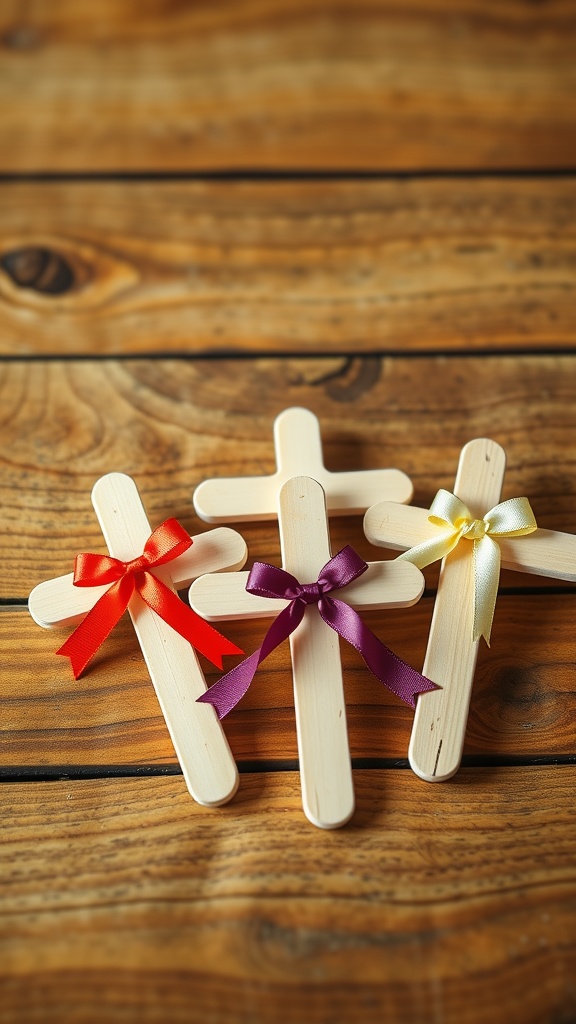
Popsicle stick crosses are a simple and meaningful craft that can add a special touch to your Easter celebrations. With just a few materials, you can create beautiful crosses that are perfect for decoration or gifting.
The image showcases a set of three crosses made from popsicle sticks, each adorned with colorful ribbons. These bright ribbons in red, purple, and yellow give each cross a unique character, making them not only fun to look at but also easy to personalize.
Creating these crosses is a breeze. Grab some popsicle sticks, glue, and your choice of ribbons. Start by forming the cross shape using two sticks. Secure them with glue, and once dry, add a lovely ribbon to complete the look. It’s a great activity for kids and adults alike!
These popsicle stick crosses can also serve as a lovely reminder of the season. Hang them on a wall, place them on a table, or even use them as bookmarks. They are versatile and bring a festive spirit to any space.
Bunny Headbands
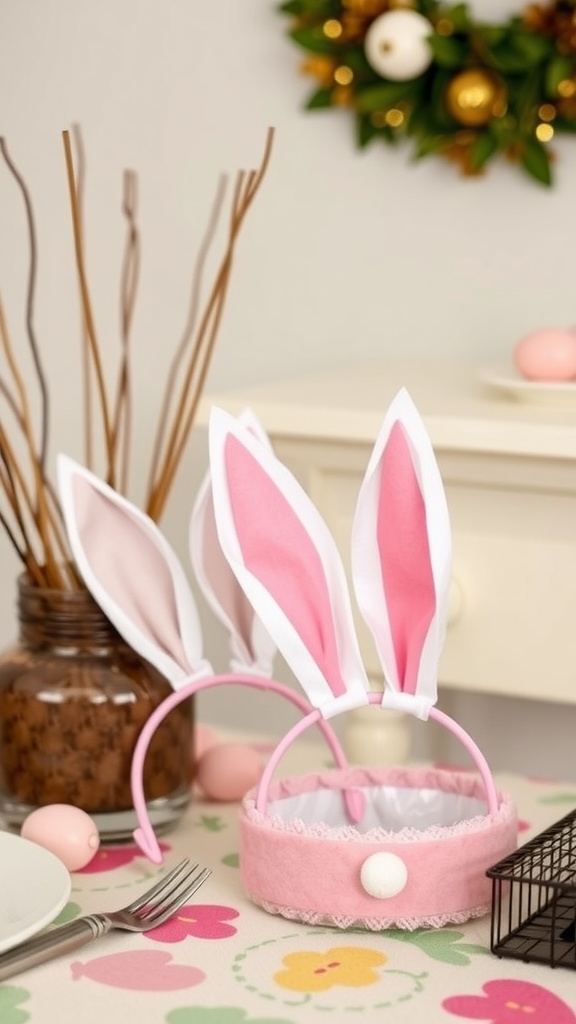
Bunny headbands are a fun and easy craft to make this Easter. They add a playful touch to any celebration and are perfect for kids and adults alike. With a few simple materials, you can create your own bunny ears that are sure to bring smiles.
The image shows a couple of adorable bunny headbands. They feature soft pink and white ears, making them cute and festive. You can see one headband in the foreground, complete with a fluffy pom pom in the center. The background is nicely arranged with a few decorative elements, creating a cheerful atmosphere.
To make these headbands, gather some felt, headbands, and a bit of glue. Cut out the ear shapes from the felt and then attach them to the headbands. You can even personalize them with decorations like lace or glitter. It’s a simple project that can be completed in no time!
Bunny Butt Garden Stakes
Bunny Butt Garden Stakes are a fun and simple way to add a touch of Easter spirit to your garden. These cute decorations look like the backside of little bunnies and make for a delightful sight among your colorful flowers.
Crafting these stakes is easy and can be done with supplies from your local dollar store. All you need are some wooden dowels, white and pink craft foam or paper, and cotton balls. Simply cut out bunny shapes, attach them to the dowels, and glue on the cotton ball for the fluffy tail.
Once you have your bunny butt stakes ready, stick them into the soil of your garden. They’ll bring smiles to everyone who sees them, making your garden feel festive and bright. Plus, you can personalize them with fun names or sayings!
Decorative Easter Egg Jars
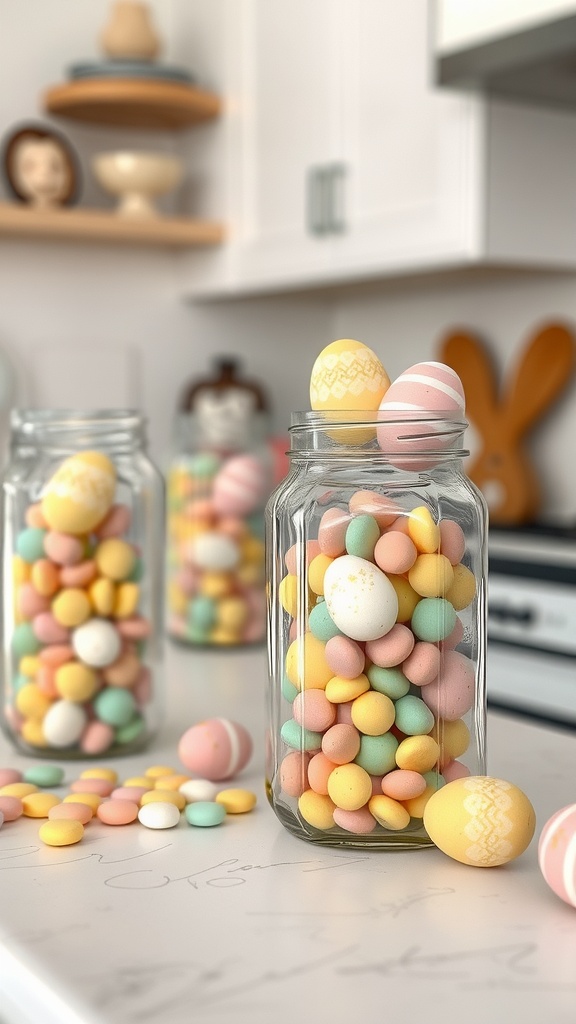
Decorative Easter egg jars are a fun and colorful way to celebrate the season. In the image, we see several jars filled with vibrant, pastel-colored eggs, creating a cheerful display. These jars not only add a festive touch to your home but also serve as a simple DIY project that anyone can enjoy.
To create your own decorative jars, start by gathering some clear jars from your local dollar store. You can use mason jars or any other glass containers you have on hand. Next, fill them with an assortment of faux eggs in various colors and sizes. The pastel yellows, pinks, greens, and whites create a delightful springtime feel.
For an added touch, consider painting some real eggs or using stickers to embellish them before placing them in the jars. This is a great way to involve the kids in the crafting process! Once your jars are filled, arrange them on your table or kitchen counter to brighten up your space.
DIY Easter Egg Garland
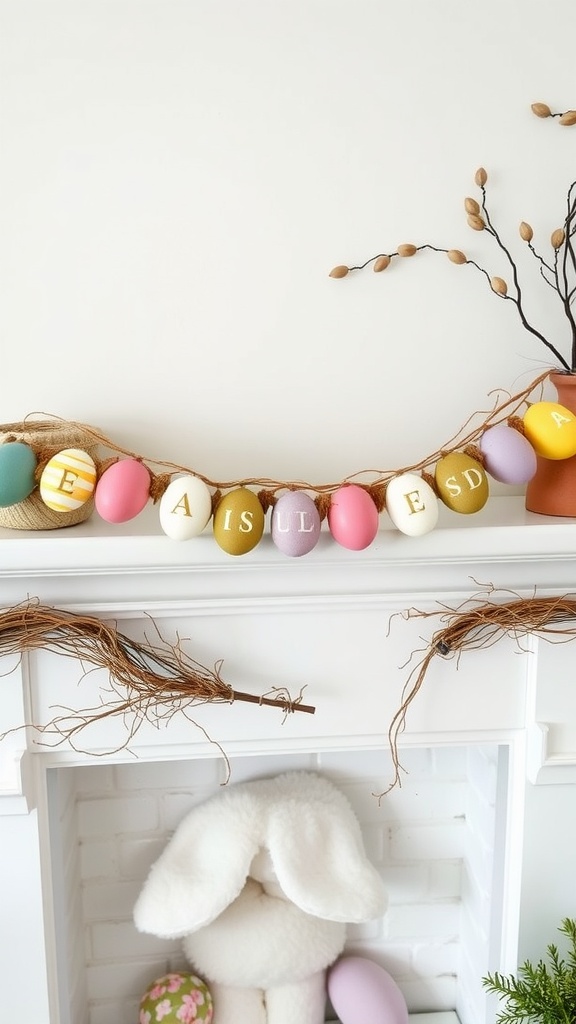
This DIY Easter Egg Garland is a fun and festive way to decorate your home for the holiday. The garland features colorful eggs that spell out cheerful messages, making it a perfect addition to your Easter decorations.
The design showcases a mix of pastel colors, including pink, purple, yellow, and white. Each egg is uniquely decorated, some with stripes and others with plain finishes. This variety adds a playful touch that brightens up any space.
To make your own garland, you can find supplies such as plastic eggs and twine at your local dollar store. Simply paint or embellish the eggs to match your style, and string them together with twine. You can even spell out a fun phrase like ‘EASTER’ or ‘SPRING’ to personalize it.
Hanging the garland above a mantel, on a wall, or even across a window can instantly create a festive atmosphere. It’s a simple project that brings joy to your home during the Easter season, and it’s easy enough for kids to help with!
Mason Jar Bunny Luminaries
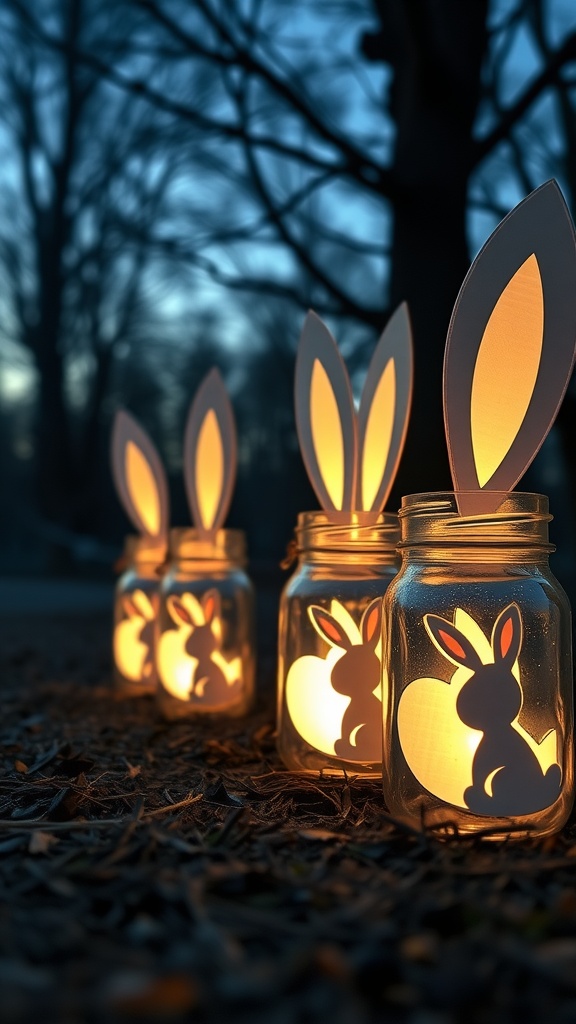
Mason Jar Bunny Luminaries are a delightful way to add a festive touch to your Easter decorations. These charming creations light up any space with a soft, cozy glow. Using simple materials, you can turn ordinary jars into whimsical bunny lanterns that bring a smile to anyone who sees them.
To create these luminaries, you’ll need mason jars, battery-operated tea lights, and some craft supplies. Start by cutting out bunny shapes from colorful paper. Attach these cutouts to the jars using glue or tape. Place a tea light inside each jar and watch as the soft light shines through, illuminating your adorable bunnies.
These luminaries are not only fun to make but also perfect for both indoor and outdoor settings. You can line your driveway or porch with them for a lovely evening display. Plus, they make for a wonderful project to do with friends or family, turning crafting time into a fun bonding experience.
So grab your supplies from your local dollar store and get started on these simple yet charming Mason Jar Bunny Luminaries. They are sure to brighten up your Easter celebrations!
Fabric Scrap Bunny Pillows
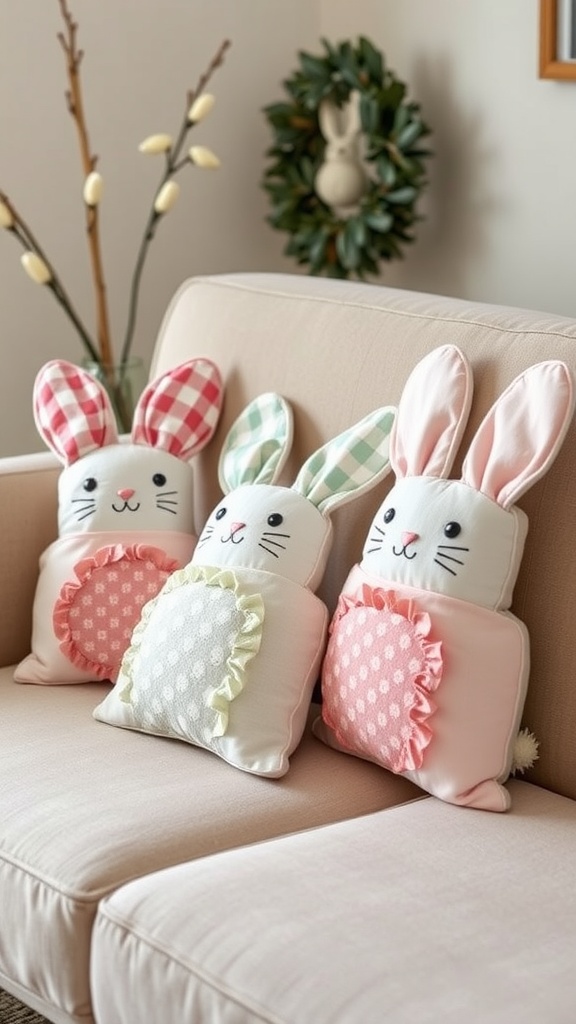
If you’re looking to add a touch of Easter cheer to your home, making fabric scrap bunny pillows is a fun and delightful project. These cute pillows can brighten up any space and are simple enough for anyone to try, even if you’re a beginner in sewing.
To get started, gather your fabric scraps. You can use old clothes, leftover fabric from other projects, or even check your local dollar store for some affordable options. Look for pastel colors and playful patterns that scream spring. You’ll also need some stuffing, thread, and a sewing machine or needle.
Begin by cutting out bunny shapes from your fabric. Feel free to mix and match different patterns for the ears and body. Once you have your pieces, sew them together, leaving an opening for stuffing. After you fill the bunny with stuffing, sew up the opening, and add cute facial features to bring your bunnies to life. Don’t forget to accessorize with ruffled fabric or buttons for a little extra flair!
These bunny pillows are not just decorations; they can also be fun gifts for family and friends. Place them on your couch or use them as Easter table centerpieces. Enjoy the crafting process and let your creativity shine as you create these charming pillows!
Bunny Greeting Cards
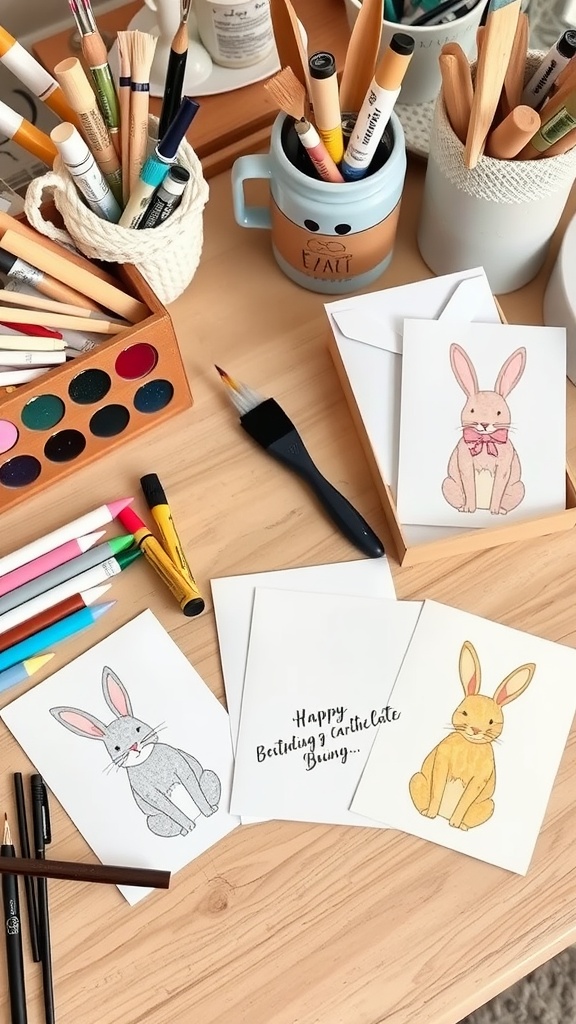
This lovely image captures the essence of crafting bunny greeting cards, perfect for Easter celebrations. On a warm wooden table, we see several adorable bunny illustrations that are ready to be transformed into cheerful cards. The bunnies feature different colors and expressions, making them delightful additions to any card collection.
Surrounding the cards is an array of art supplies, from colorful pencils and markers to watercolors. This creative setup inspires anyone to dive into crafting. The vibrant colors of the art supplies hint at the fun you can have while making these cards.
To create your own bunny greeting cards, start by gathering your materials: blank cards, markers or colored pencils, and your favorite bunny designs. Simply sketch or trace the bunnies onto the cards, adding personal touches like messages or decorations. Don’t forget to include a fun greeting like, ‘Happy Easter!’ to spread some joy!
These handmade cards make for charming gifts to send to friends and family. Plus, they can be easily made with supplies found in most dollar stores, making this project budget-friendly. So, grab your crafting supplies and let your creativity hop into action!
Twine Wrapped Easter Eggs

If you’re looking for a fun and simple Easter craft, twine-wrapped eggs are a delightful choice. This project is not only easy to do, but it also turns ordinary eggs into charming decorations for your home.
The image shows a lovely arrangement of eggs nestled in a wooden bowl, surrounded by soft twine. Some eggs are dyed in soft colors, while others remain white, creating a beautiful contrast. The texture of the twine gives each egg a rustic feel, making them perfect for spring.
To get started, gather some plain plastic or real eggs, twine, and scissors. Begin by wrapping the twine around the egg, securing it with a knot to hold it in place. You can mix and match colors of twine to create unique designs. This craft is a perfect way to get creative and personalize your Easter decor!
Eggshell Planters
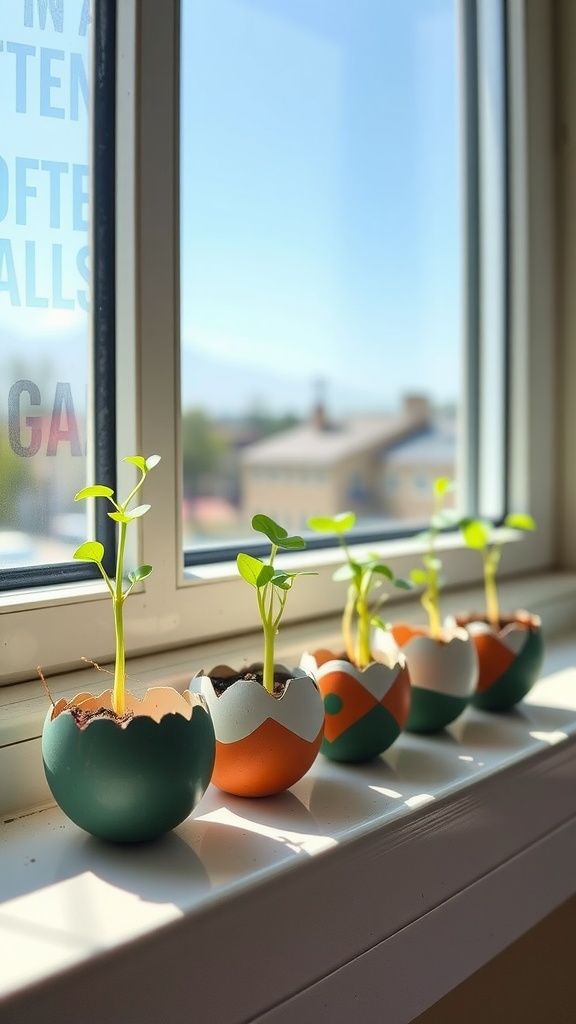
Eggshell planters are a fun and creative way to bring some springtime cheer into your home. Using empty eggshells, you can create charming little pots to grow seedlings. It’s a simple project that adds a splash of color to your windowsill.
In the image, you can see several decorated eggshells, each holding a tiny plant that is reaching for the sunlight. The pastel colors and patterns on the eggs make them look festive and eye-catching. This is a perfect way to recycle eggshells and add a touch of green to your decor.
To create your own eggshell planters, all you need are some empty eggshells, potting soil, and seeds of your choice. Carefully crack the eggshells and rinse them out. Fill each shell with soil, then plant your seeds. Place them on a sunny windowsill, and watch them grow!
DIY Easter Basket Liners
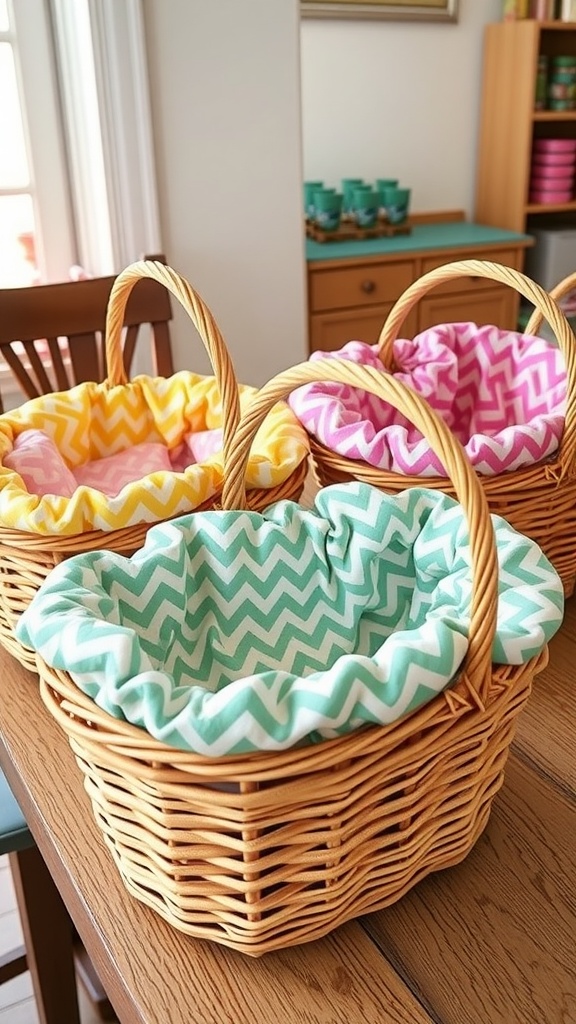
Creating your own Easter basket liners is a fun way to personalize your holiday decorations. The image shows three charming baskets, each lined with fabric in cheerful colors and patterns. This adds a touch of joy and creativity to your Easter celebrations.
To make these liners, all you need are some simple supplies from your local dollar store. Look for seasonal fabric or any colorful options that catch your eye. Measure the inside of your basket to determine how much fabric you’ll need. With a few easy sewing steps, you can create a custom fit that brightens up your basket.
Start by cutting the fabric to size, allowing for some extra material to create a gathered edge. Then, sew a simple channel along the edge, threading in a ribbon or string to help it fit snugly in the basket. This DIY project not only adds a festive flair but also makes for a lovely keepsake that you can reuse each year.
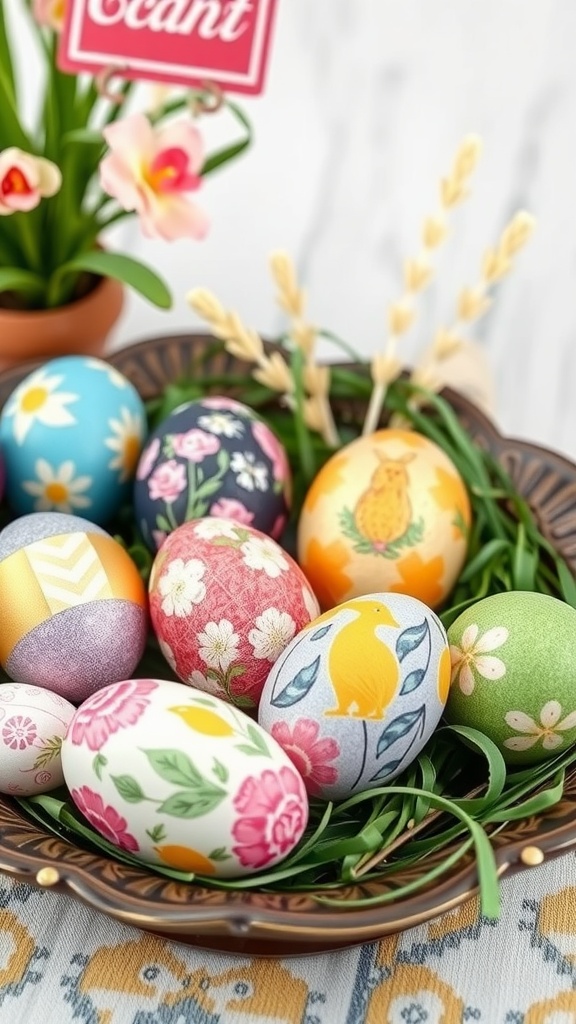
Egg Decorating Station
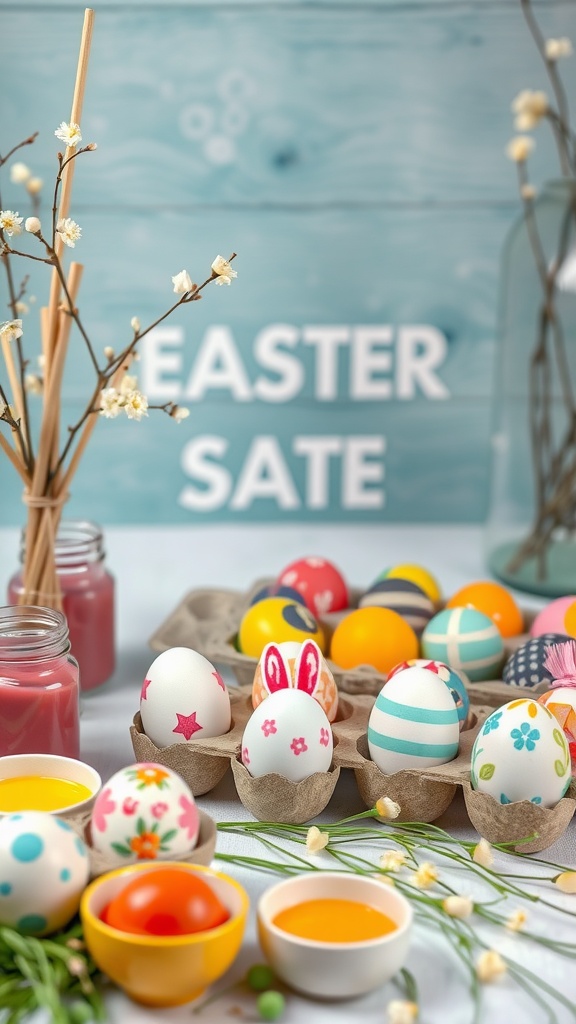
Setting up an egg decorating station is a fun way to celebrate Easter. The image shows a colorful array of eggs ready for some creative touches. With a variety of colors and designs, it’s an inviting space for everyone to join in.
The eggs are displayed in an egg carton, making it easy to reach for the next one. There are also small bowls filled with paint, perfect for dipping or brushing. This setup encourages imagination and creativity, allowing everyone to express their artistic flair.
In the background, you can see a cheerful ‘Easter’ sign that sets the festive mood. The soft colors of the eggs and the decorations add to the cheerful atmosphere. It’s a simple yet effective way to bring people together during this joyful season.
Bunny Footprint Trail
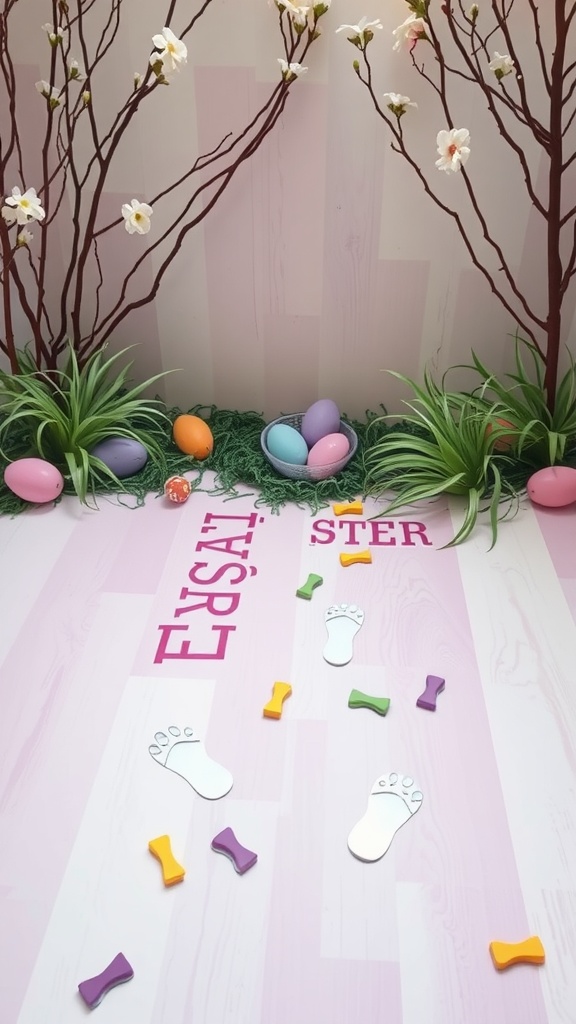
This Bunny Footprint Trail is a fun and playful decoration for Easter. It sets a cheerful tone for your holiday celebrations. The image shows adorable bunny footprints leading through bright colors and decorative elements.
Using simple materials from dollar stores, you can create a delightful path for kids to follow. The bunny footprints can be cut out from craft paper, and the colorful shapes scattered around add extra charm. It’s a creative way to engage little ones and make the day feel special.
To set up your Bunny Footprint Trail, start by deciding on a path in your living space or yard. Place the bunny footprints down first, spacing them out to create a trail. Then, sprinkle in some colorful foam shapes or plastic eggs to make it even more inviting. This craft is an easy way to bring excitement to your Easter festivities!
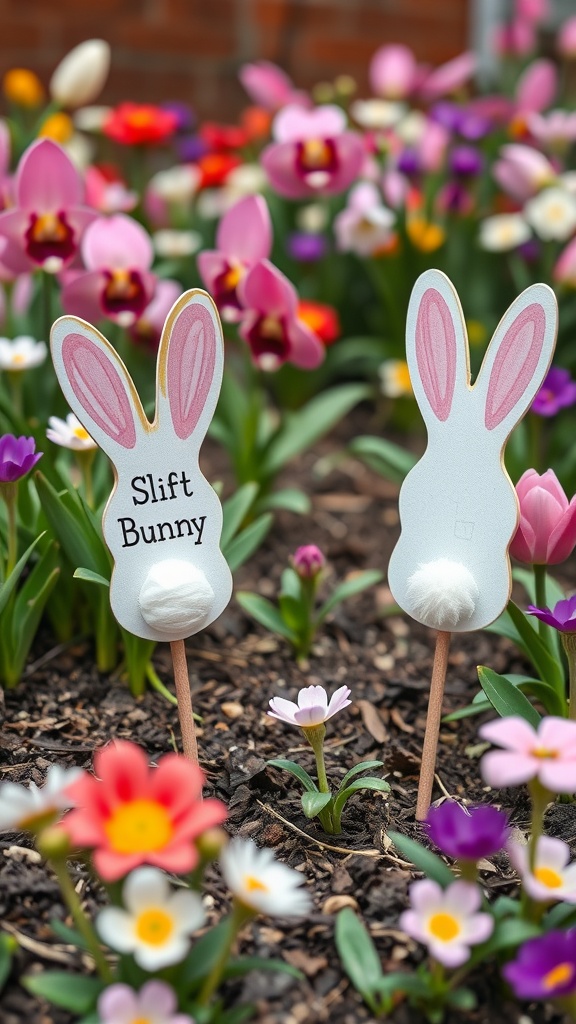
Easter Egg Hunt Signs
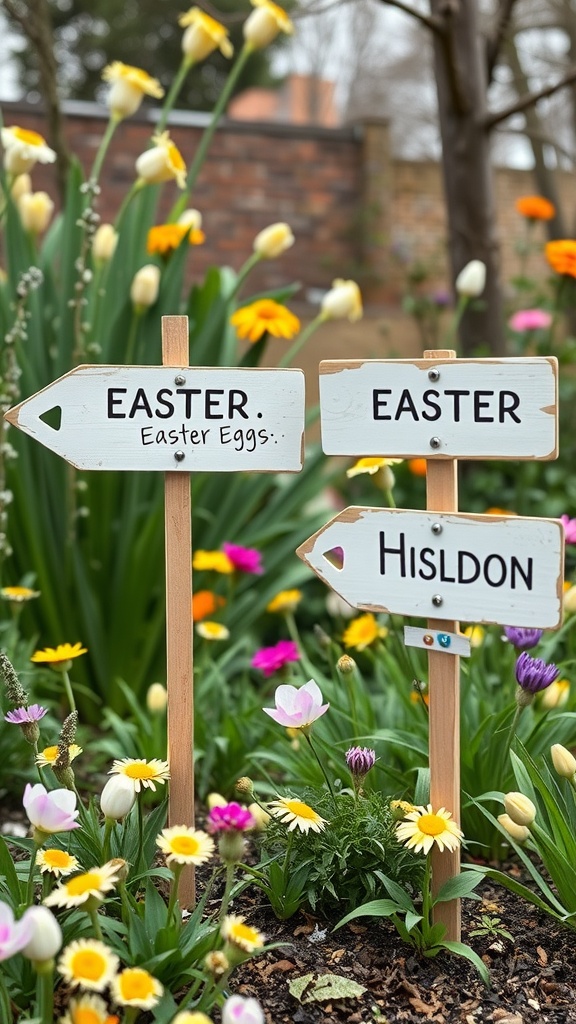
Easter is a delightful time for family gatherings and fun activities like egg hunts. One charming way to guide little ones on their quest is by using DIY Easter egg hunt signs. These signs not only provide direction but also add a festive touch to your outdoor space.
The image shows two wooden signs in a vibrant garden filled with colorful flowers. Each sign points the way to ‘Easter’ and ‘Hislidon,’ with a playful mention of ‘Easter Eggs.’ This simple setup sparks excitement and curiosity among children, making the hunt even more enjoyable.
Creating your own signs is easy and can be an enjoyable craft project. You can find inexpensive materials at dollar stores, like wooden stakes and paint. Customize them with cheerful designs or colors that match your theme. Whether you place them near bushes or along garden paths, these signs will help guide eager hunters to their hidden treasures.
So gather your supplies, get creative, and make your Easter egg hunt more engaging with these charming signs. It’s a fun way to celebrate the season while keeping everyone on track!
Spring Flower Bouquets
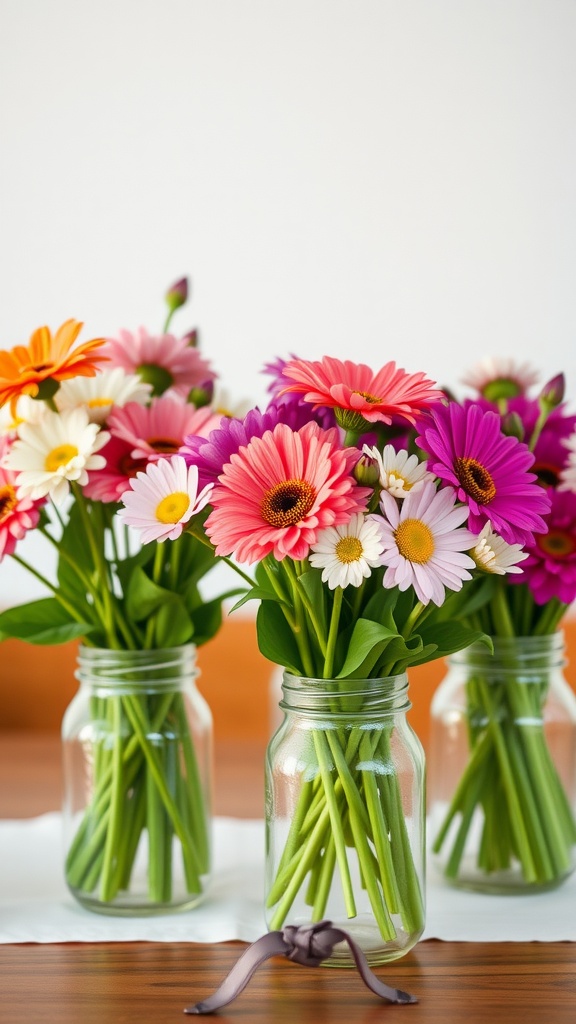
Spring is a time of renewal, and what better way to celebrate than with vibrant flower bouquets? These cheerful arrangements can brighten up any room and are a fun DIY project you can tackle with items from your local dollar store.
In the image, you see beautiful bouquets filled with colorful flowers like daisies and gerberas. Using mason jars as vases gives them a charming rustic look. You can create a similar display by gathering a few supplies, including artificial flowers, mason jars, and some ribbons.
To make your own spring flower bouquets, first, gather all your materials. Cut the stems of the flowers to your desired length and arrange them in the jar. Add a touch of greenery to fill in gaps. Finish by tying a ribbon around the neck of the jar for an added decorative touch. This simple project is both relaxing and rewarding!
These spring flower bouquets also make lovely gifts. Consider making a few to share with friends and family during Easter gatherings. They are a great way to spread a bit of spring cheer without spending a lot.
Decoupage Easter Eggs
Decoupage Easter eggs are a fun and creative way to celebrate the holiday. This craft is all about transforming plain eggs into beautiful decorations using simple materials from your local dollar store.
The image shows a lovely assortment of decoupage eggs nestled in green grass. Each egg features unique patterns, from floral designs to colorful illustrations. This variety adds a cheerful touch to any Easter setup.
To create your own decoupage eggs, gather some plain plastic or real eggs, Mod Podge or white glue, and decorative paper. You can find everything you need at your nearest dollar store. Cut the paper into small pieces or shapes you like. Then, apply the glue to the egg and stick the paper on, smoothing it out as you go. Once you’ve covered the egg, add a layer of glue on top to seal it.
This craft not only allows for personal expression but is also a great activity to do with family or friends. You can even host a decoupage party where everyone brings their own ideas and materials. Get creative and mix colors and patterns for a unique display! Your finished eggs can be used as table centerpieces or hung up as festive decorations.
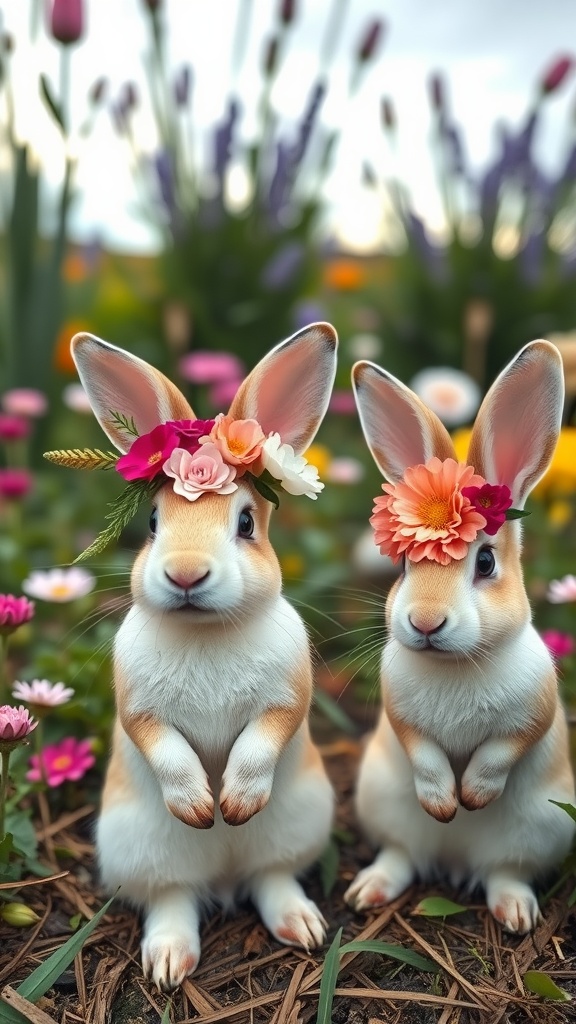
Flower Crown Bunnies
Easter Bunny Signs
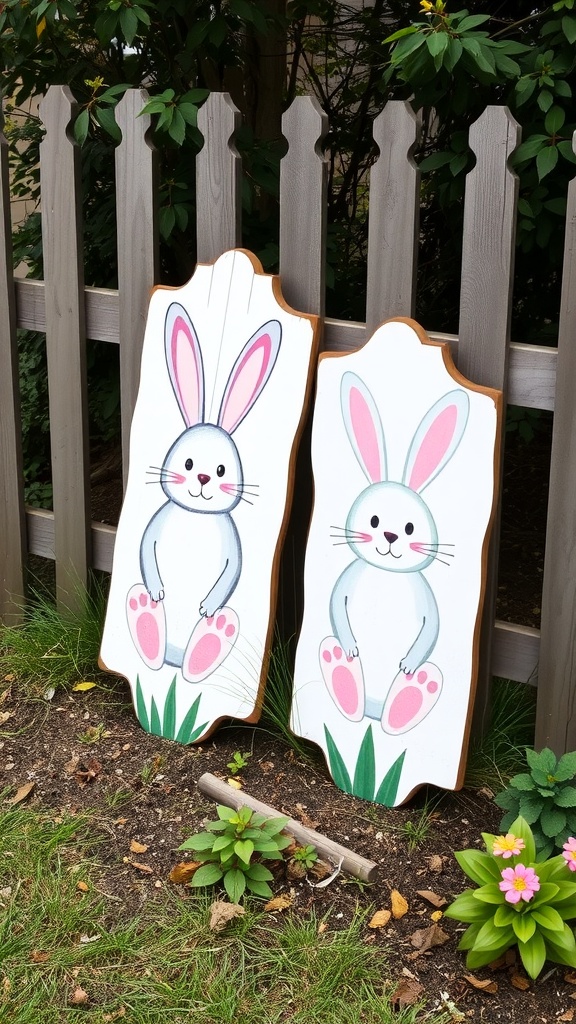
Easter Bunny signs are a delightful way to add some charm to your holiday decorations. The image shows two wooden signs featuring cute bunny illustrations, perfect for anyone looking to enhance their Easter spirit.
These signs can be easily made with supplies from your local dollar store. Just grab some wooden boards, paint, and brushes. The bunnies in the image are painted with soft colors, giving them a cheerful look that fits well in any garden or yard.
To create your own Easter Bunny signs, start by cutting the wood into desired shapes. Once you have your base, use acrylic paints to add your bunny designs. Don’t forget to include some grass details at the bottom to make them look lively!
Once painted, you can place these signs in your yard, by your front door, or even inside your home to spread some Easter cheer. They serve not just as decorations, but as a fun DIY project that can involve the whole family.
Nail Polish Marble Eggs

One of the most fun and creative Easter crafts is making nail polish marble eggs. This simple project brings a splash of color and style to your holiday celebrations. The image showcases a beautiful collection of marbled eggs, each featuring unique swirls of vibrant colors.
To get started, you’ll need a few supplies: white plastic or hard-boiled eggs, nail polish in various colors, a bowl of water, and some gloves to keep your hands clean. The process is easy and entertaining for both kids and adults.
Begin by filling a bowl with water. Then, drop a few drops of nail polish on the surface of the water. Use a toothpick or stick to swirl the colors together gently. Once you have a design you love, dip an egg into the water quickly. The nail polish will cling to the egg, creating a stunning marbled effect. Let the eggs dry and display them in a decorative bowl or hang them as ornaments.
This craft is not only a great way to decorate for Easter, but it also allows for endless creativity. No two eggs will turn out the same, making each one special. Plus, it’s a budget-friendly project that you can easily do with supplies from the dollar store!
Button Decorated Eggs
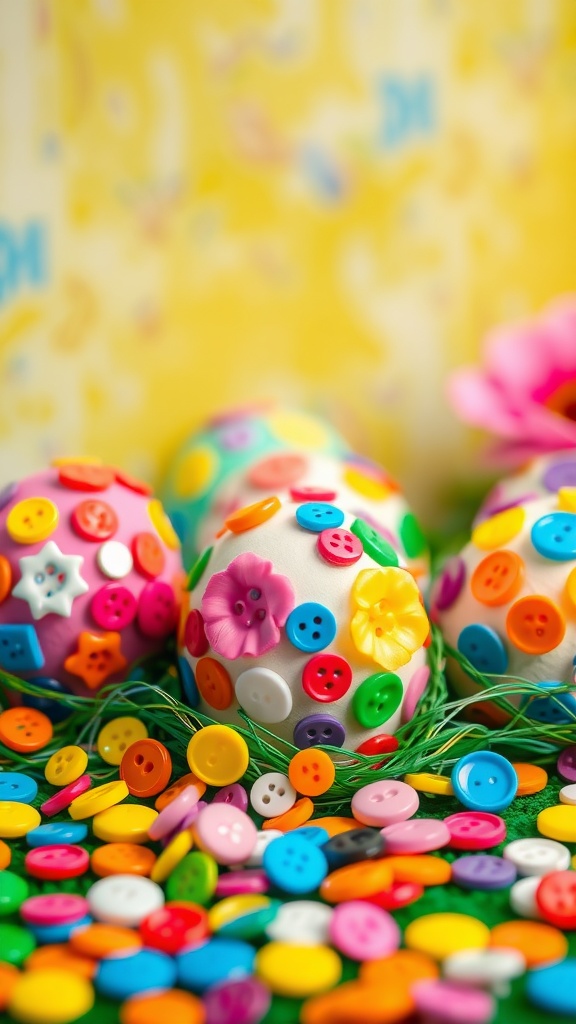
Button decorated eggs are a fun and creative way to celebrate Easter. You can transform ordinary eggs into colorful masterpieces using just a few supplies from your local dollar store.
To get started, you’ll need some plastic or real eggs, a variety of buttons in different sizes and colors, and glue. The idea is simple: apply glue to the surface of the egg and stick the buttons on. You can arrange them in patterns, clusters, or even spell out a name!
This craft is perfect for all ages. Kids will love choosing their favorite buttons and creating their own designs. Plus, it’s a great way to spend some quality time together during the holiday.
Once your eggs are decorated, display them in a basket or use them as part of your Easter table décor. The bright colors and playful designs are sure to bring a cheerful vibe to your holiday celebrations. Enjoy making your button decorated eggs!
Easter Basket Tags

These cute Easter basket tags are a delightful addition to your holiday celebrations. Made with fun colors and adorable bunny designs, they bring a cheerful touch to any Easter basket. Each tag features a playful bunny, making them perfect for kids and adults alike.
You can easily create these tags using supplies from your local dollar store. Grab some colored cardstock, scissors, and twine or ribbon to make your tags pop. Personalizing each tag is a great way to show your loved ones that you care.
To make the tags, simply cut the cardstock into your desired shape, draw or print bunny illustrations, and write names or messages on them. These tags are not only decorative but also practical, helping to identify whose basket is whose during an Easter egg hunt!
Jelly Bean Filler Decor
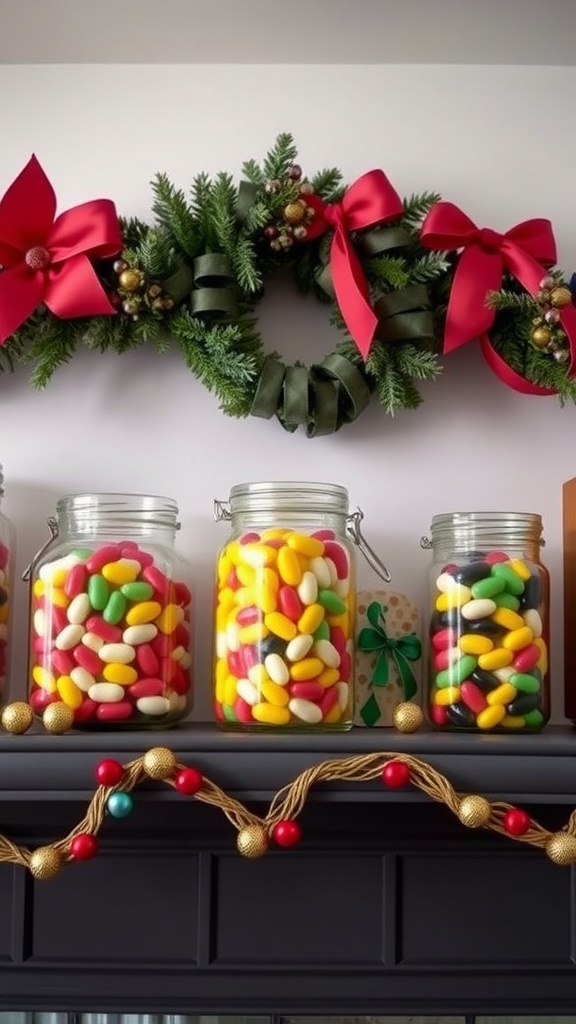
Spring is a perfect time to brighten up your home with some fun and colorful decorations. One easy way to do this is by using jelly beans as a filler for jars and vases. These vibrant candies not only add a splash of color but also bring a sense of joy to any space.
In the image, we see beautifully arranged jars filled with jelly beans in various colors. The clear jars allow the bright candies to shine through, creating an eye-catching display. You can use these jars as centerpieces or place them on a mantel to bring some festive spirit to your home.
To create your own jelly bean decor, simply gather some clear jars from your local dollar store. Fill them with an assortment of jelly beans in different colors. You might want to mix flavors or stick to a color theme that matches your spring decor. Add a touch of greenery or ribbon around the jars to enhance the look!
This simple craft is not only fun to make but also budget-friendly. Plus, it’s a great way to involve kids in decorating for the season. They’ll love picking out their favorite jelly bean colors and arranging them in jars. Remember, the goal is to have fun and enjoy the process of crafting together!
Painted Rock Decorations
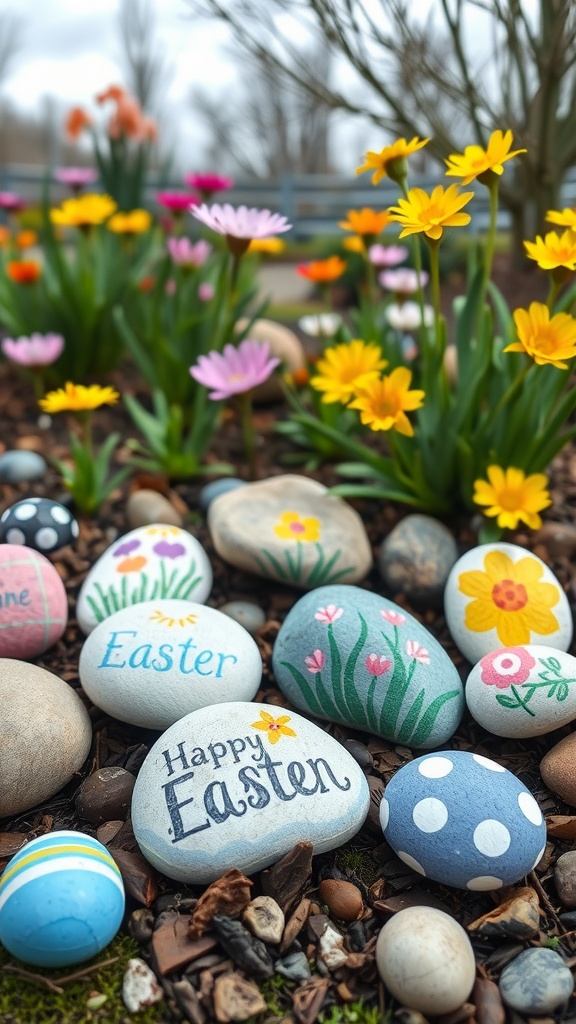
Painted rock decorations are a fun and creative way to celebrate Easter. They bring a splash of color and a personal touch to your garden or home. The image shows a lovely assortment of painted rocks nestled among vibrant flowers, showcasing cheerful messages and playful designs.
Using simple supplies, you can transform ordinary rocks into delightful Easter decor. Grab some river stones, acrylic paints, and brushes from your local dollar store. The process is straightforward: choose your rock, paint it with bright colors, and let your imagination run wild with designs. You can write greetings like ‘Happy Easter’ or add flowers and patterns.
Once your rocks are painted and dry, place them in your garden or near your front door. They can brighten up any space and even serve as a conversation starter for guests. Plus, this craft is easy to do with kids, making it a perfect family activity during the holiday.
As you decorate, consider the theme of your garden. You can match colors to the surrounding flowers or create a whimsical Easter scene with bunnies and eggs. The possibilities are endless!
Eggshell Candles
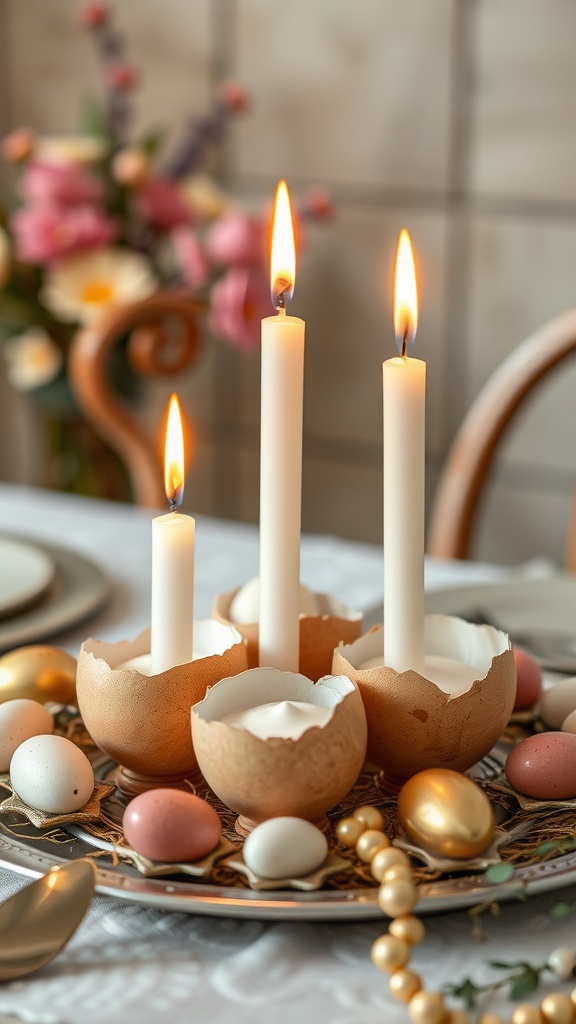
Eggshell candles are a charming and creative way to add a festive touch to your Easter celebrations. They look beautiful on any table, making them a delightful centerpiece.
To make these candles, start by carefully cracking eggshells in half. You can use the eggs for your favorite recipe afterward. Then, melt some wax and pour it into the shells, leaving a little space at the top for a wick. You can find wicks at craft or dollar stores, which keeps everything budget-friendly!
While the wax sets, you might decorate the eggshells with paint or washi tape if you’d like. Once dry, place the wicks in each shell and light them up. The soft glow from the candles creates a warm and inviting atmosphere.
Pair your eggshell candles with some pastel-colored decorations or fresh flowers for a lovely Easter display. It’s a simple craft that not only brightens your home but also makes use of materials you might have on hand!
Bunny Treat Bags
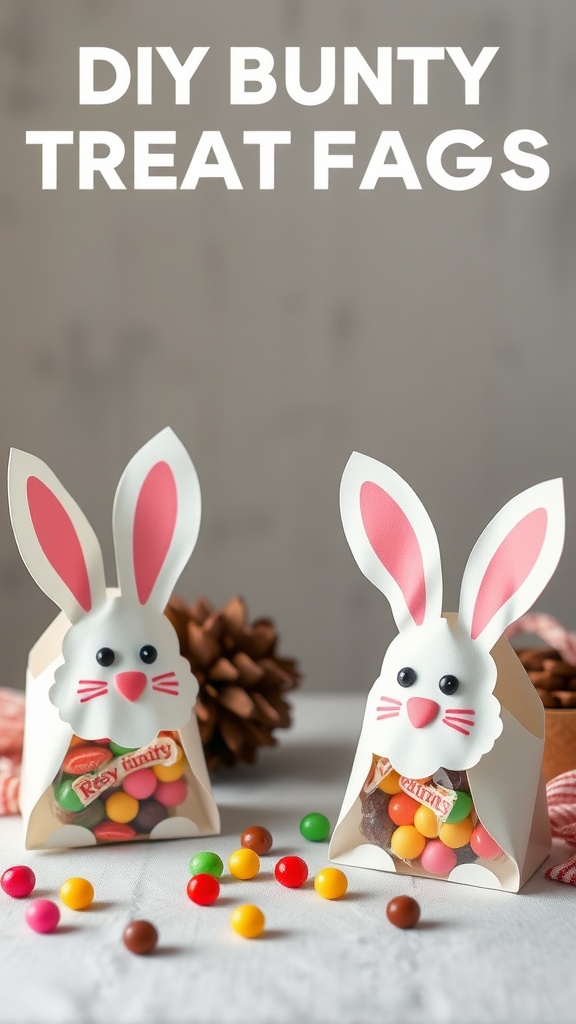
Bunny treat bags are a cute and fun way to add a festive touch to your Easter celebrations. These little bags can be filled with candies or small treats, making them perfect for kids and adults alike. And the best part? You can create them using simple supplies from your local dollar store!
In the image, you can see two adorable bunny treat bags. Each bag has big floppy ears and a cute face, inviting anyone to take a peek at the sweet goodies inside. The colorful candies scattered around add to the playful vibe of the scene.
To make your own bunny treat bags, you’ll need some cardstock, scissors, and glue. Start by cutting out the shapes for the bunny’s face and ears. Assemble the pieces and attach them to a small bag that can hold your treats. Fill it up with candy, and you’ve got a delightful gift for friends or family!
These bunny treat bags are not just for gifting; they can also serve as festive decorations for your Easter table. Place them around, and they’ll surely bring smiles to everyone who sees them. Get creative with colors and designs, and enjoy the process of crafting!
Colorful Egg Decorating Ideas

DIY Chick Stamps
Create your own adorable chick stamps for Easter crafts! It’s a fun way to add a personal touch to your decorations or cards. You can make them using simple materials that you can find at your local dollar store.
The main ingredient is a sponge, shaped like a chick. Just cut a sponge into a chick form, add some paint, and you’re ready to stamp! You can use yellow paint for that classic chick color, and even add some black for the eyes.
These chick stamps can brighten up any project. Use them to stamp on cards, wrapping paper, or even fabric. Kids will love making their own unique designs, spreading joy this Easter season.